Showing posts with label Crafts. Show all posts

Wednesday, 10 July 2013

Featuring... "We Love Craft" sellers

Me again!

So you may have seen that we are attending the "We Love Craft" fair in Enfield on Saturday 13th July so I thought it would be a good idea to showcase some of the very talented crafters I will be selling alongside.


Beautiful sewing and paper crafts

Home Sweet Home by Little Owl Boutique


More beautifully sewn items, including some fun sock monkeys!! 

Oscar the sock monkey by Craftee Fox


Intricate beaded jewellery

Bracelet by CJ Creations


Stunning henna inspired decorated homeware

Decorated candles by Henna Sparkles


Unique home accessories including handamde Provencal lavender accessories

Lavender pounces by Les Anglaise Provencale


Irresistible fragranced candles

Rose container candle by The Candle Cellar


Lovely crochet accessories

Sweet baby booties from Sparkling Bits


That's all of them for now, as you can see there are some fantastic sellers attending!  For more details on the event please visit the facebook event.  This event is run monthly so if you can't visit in July then there will be plenty of other opportunities.

If I hear of any other sellers (as I think there are about 25 of us at the event) I will add them to this post.

Hope to see you there.

Until next time...

Amanda xx

Wednesday, 29 August 2012

A crafty bank holiday

Hello all,

So I hope you all had a great bank holiday weekend, I am loving the fact that it's already half way through the week and that it's now nearly the weekend :) 

Our weekend was spent with old friends and started with a damp but fun BBQ (what did we expect?!  No one books a BBQ for bank hol weekend, it is destined to rain!!)  However, on Sunday I had a go at some new crafts with "K" whilst the boys played golf.  Here's what we tried:

Book binding

Using some very detailed (and a tad confusing at times) instructions from Pinterest we created a hand bound fabric covered notepad each using some very pretty fabric I picked up in the Liberty's off cuts bin (love that place!) and decorated the outside


I have to admint, not bad for a first attempt... look forward to making more!

Glass engraving

After seeing a post by a fellow blogger The Pea Pod on glass engraved tea light holders I just had to give it a go and after seeing her designs thought it would be great if I could make 40 for our wedding next year (hmmmm!)

So I purchased an engraver and attempted my first "simple" dandelion design.  NB - need to buy some safety specs!!  This is the result.....


I think need I need to practice first before I attempt the more complicated designs for the wedding.

But anyway, it was good fun and kick started me back into trying new crafts and look forward to whatever I try next.

What crafts have you tried or shall I try next?!  Answers below greatly appreciated!!

Until next time...

Amanda xx

Tuesday, 8 May 2012

Buy Handmade Gifts.... for Father's Day

So, with Father's Day being on Sunday 17th June this year, why not treat your Dad (or Grandad, Step Dad, etc!) to one of these lovely gifts.

Glass Fused Cufflinks by Caro Fusion - £10

Caro Fusion


Father's Day Medal by Little A Designs - £18.50

Little A Designs


Leather Glasses Case by Triboreleather - £14

Triboreleather


Brown Leather Cartoon Silhouette Belt by Backbeat Leather - £35

Backbeat leather


Personalised Grid Reference Cufflinks by Alison Moore Designs - £60

Alison Moore Designs


Personalised Name Cushion by Berry Nice Cushions - £25

Berry Nice Cushions


Upcycled Typewriter Key Tie Pin by Zincwhite - £7.50

Zinc White


Dad Keyring by Jupiter Rocks - £14.99

Jupiter Rocks


 Shabby Chic Distressed Dad Hero Plaque by Kristi-Krafts - £4.49

Kristie Krafts


"Dad's Book" Paperclip Bookmark by Lauren's Ceramics - £7.95

Lauren's Ceramics


What a fantastic selection of ideas for Father's Day hey?!  Hope you find some inspiration from these and treat your Dad on the 17th June.

See you next time...

Amanda x

Wednesday, 2 May 2012

Keep Calm and Shop Handmade - Spitalfields

Hello everyone!

Just a quick one this evening but I thought I'd show off the flyer for the Fifi's Market event being held at Old Spitalfields on the 9th June.

Water Lily Wishes

In the next few weeks I will be showcasing the other sellers who will be joining me, so why not pop back here to see who else will be selling. 

Spitalfields Market is a great day out, a whole range of fantastic products and I am proud to be included in this event!

So why not come along and visit us (I will be posting a Spitalfields offer on here soon).

Until next time...

Amanda x

Friday, 27 April 2012

Buy Handmade Gifts.... Just Because!

So, as some of you know I love the idea of either buying handmade presents or making presents for people.  It's my aim this year to do just that, buy or make as many handcrafted gifts as possible.  I've been looking into ideas and on my search I have come across some truly talented crafters (some of whom will be interviewed over the coming months)!  And whilst I am going to be doing a "buy homemade for Christmas" post in November, I just had to showcase some of the great crafts and products I have already found on facebook! 

This is just a small proportion of crafters, I'm thinking I may have to do a few more posts like this over the coming months as handmade presents shouldn't just be for Christmas!

Why not check out these products, I've linked to their facebook pages or websites so you can visit them to see more of their fabulous work......


Coffee Lover Clock by JewelOri - £15

JewelOri


"Apple for Teacher" thank you gift by Holly-blues and Quirky-birds - £5.49

Holly blues and quirky birds


Phone sleeve by Beautiful Bags by Bellus Pera - £10
 
Beautiful bags by Bellus Pera

Selection of Gourmet Marshmallows (Raspberry, Key Lime Pie and Triple Chocolate!) by Burgh Bakes - £3.25 (price varies depending on flavour)
 
Burgh Bakes

Basil and Blossom cushions by The Sherbert Patch - £12.95 (each)

The Sherbert Patch

 Well, I hoped you liked them as much as I do.  Will feature some more soon as I can't believe how much fantastic talent there is out there!!

If there are any types of gifts you'd like to see, e.g. for men, for the home then leave your suggestion in the comments and I'll try an put together a feature.

Until next time

Amanda x

Saturday, 7 April 2012

Featuring... JewelOri

This is the first of my monthly “Featuring…” posts where I will be interviewing a fellow crafter who I’ve had direct experience with and think they are fab!  I’ll be finding out what they do, where they draw their inspiration, and because I love going on holiday – where their dream holiday would be! 

So without further ado, here is the fabulous JewelOri……


Q.  Can you tell me a little bit about yourself?

Hello! I am a full-time student studying MSc Occupational Therapy and also a part-time care worker. In my spare time I love crafting, and I will try anything I discover e.g. knitting, jewellery making, decoupage, crochet and paper-sculpting.  I relish watching craft programmes such as the ones by Kirstie Allsopp and also reading craft books and magazines, my current favourite is Simply Homemade magazine.

Q.  And what is JewelOri and how did it come about?

JewelOri combines my passion for glitzy bits and jewellery making (Jewel) with paper and paper-crafts (Ori – from origami).  Initially I went to an origami club at University as a joke but really enjoyed it; my sister bought me a book which merged origami and jewellery together. I then expanded to other paper-crafts and paper sculpting, I began to design home decorations, gifts and Christmas decorations alongside my jewellery. I started to sell at craft fairs and via Facebook as a hobby business.  From there I have now started to blog, Tweet and have an online shop on www.tosouk.com.

Q.  Your designs are gorgeous, where or what do you get your inspiration from?

I get my inspirations mainly from the seasons and my current surroundings.  I love anything bright and bold, quirky and unusual, along with a bit of sparkle every so often.  I like to see what others are doing in their work (fashion, home décor etc) and design my items to compliment current fashions and trends, as well as more unique tastes. Well you have to have something to suit everyone!

Q.  If you had to name a favourite piece that you’ve made, which would it be? 

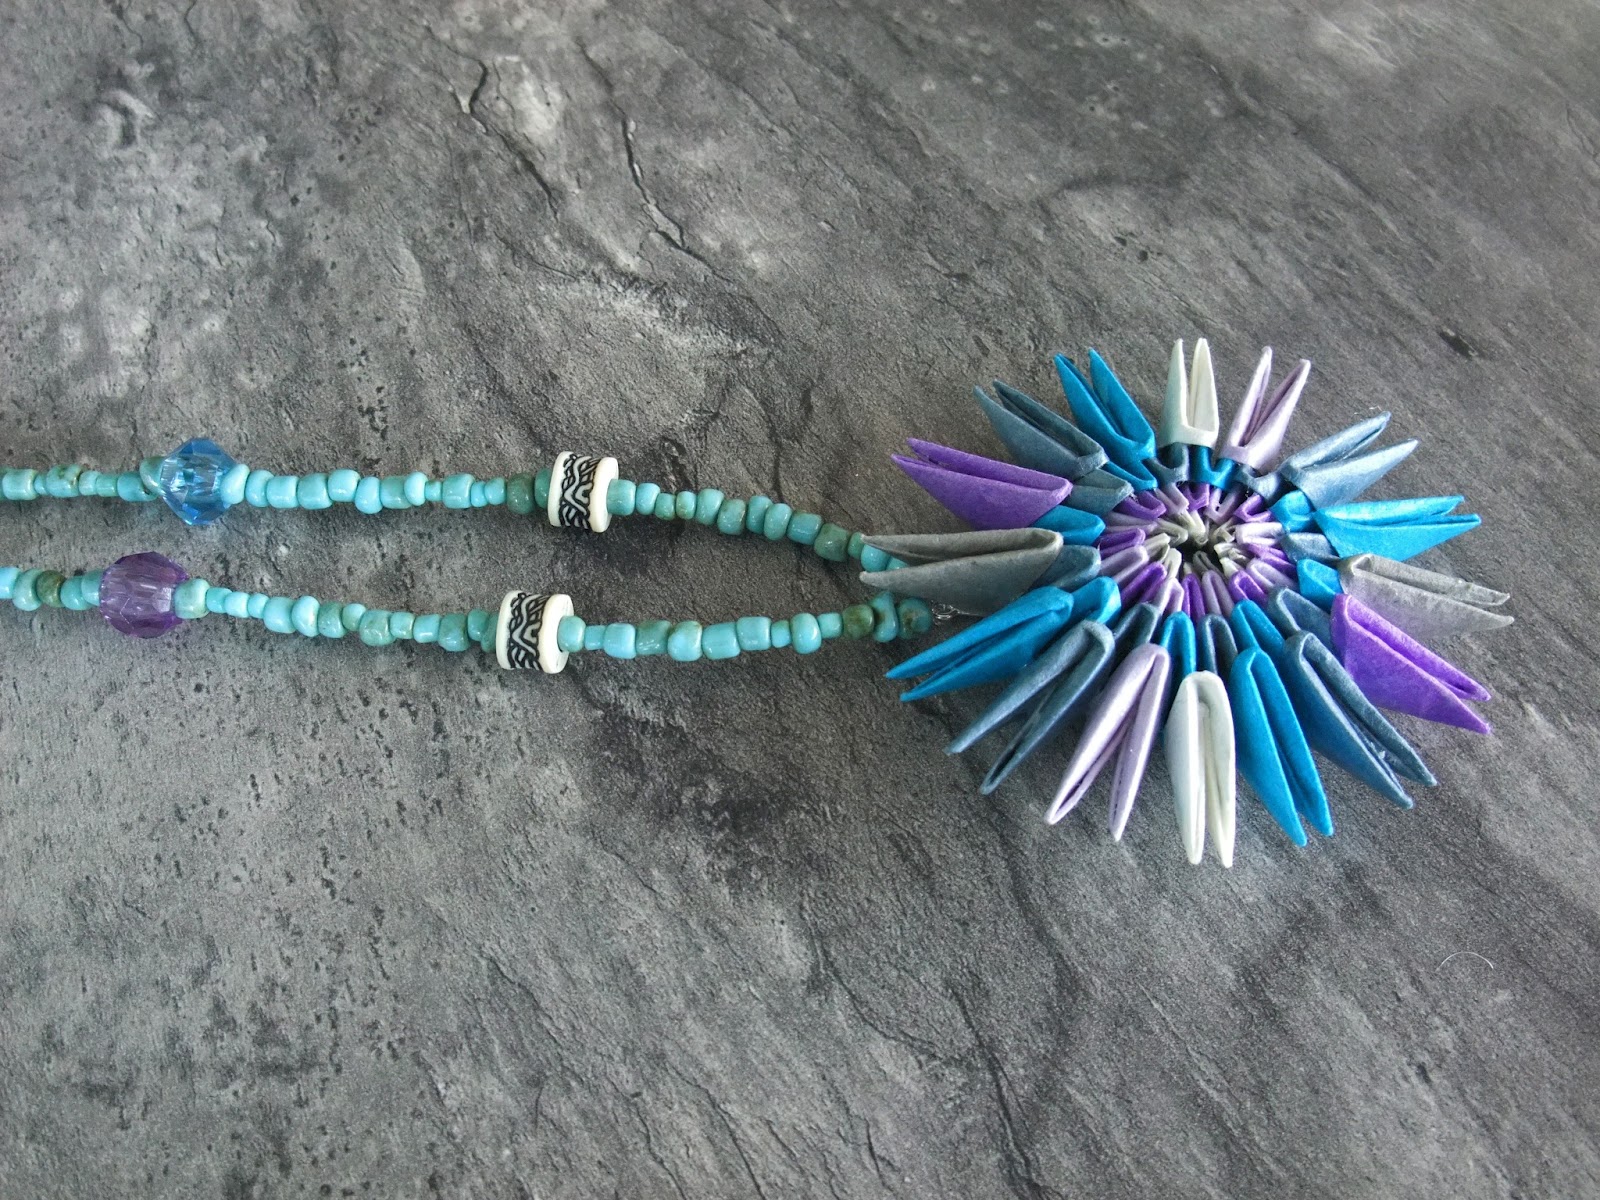
My favourite piece has to be the first necklace I ever made. It is created from 64 individual pieces of paper entwined together to create a starburst effect. It takes a lot of patience and time to create but I think it really is worth it!


Q.  How can people get in contact with you and see your beautiful products?

Twitter - @JewelOri
Email – jewelori@hotmail.com

Q.  Random question – what would be your dream holiday?

My dream holiday would be to return to Townsville, Australia I had an awesome time there.  However to address my childish side I’d love to visit the Harry Potter theme park at Disney, Orlando!!

Q.  And last question, what does 2012 hold for JewelOri?

2012 is rather hectic personally as I’ve just started my degree, but I have a few craft fairs lined up including the Norwich Makers Market on the 17th April. This year’s main focus is to be on networking with my blog and online-shop and to raise my profile with Twitter and Facebook

Thank you JewelOri 

I hope you’ll all go and visit JewelOri on and take a look at her designs, I’m especially excited as I’ve ordered 100 origami roses for our wedding table centre pieces and origami roses for the guys buttonholes!

Take care and until next time….

Amanda x


Tuesday, 3 April 2012

DIY Crafts - Flower Arranging

So it’s another “first” post, this time I’m doing a DIY craft feature where I hope to impart a newly acquired skill or give away a freebie download.  This time, I’m going to show you how to arrange flowers!

For Mother’s Day weekend; my sister (and fellow blogger – JewelOri), her other half (I’ll call him J) and myself set about making a flower arrangement to give to our Mum’s.  I was very surprised at how well they turned out, so much so that J’s Mum didn’t believe he had made it!!!  See for yourself…


So here’s how to do it.

What you will need:

-          Florist oasis (can be bought online or at most garden centres)
-          Knife (to cut the oasis )
-          Florist scissors
-          Greenery (can be taken from garden – in our case it was Mum’s garden!)
-          Flowers (we used supermarket flowers, each arrangement used one small bunch)
-          Sturdy flower put (i.e. not plastic)
-          3 Sticks for the trunk of the arrangement (we used twisted willow branches, again from Mum’s garden)
-          Bowl or sink of water

Step 1 – Cut your oasis

You will need two cubes, roughly 4 inches by 4 inches (10cm) with the edges and corners rounded.  It doesn’t have to be perfectly spherical.  Then place these into a bowl of water and let them sink.  Do not push them into the water otherwise you’ll get air bubbles.


Step 2 – Pick your greenery

You’ll want something leafy so that you can cover the bottom and fill out the flower ball on the top.  The end result is to have something that looks like a topiary bay leaf tree.


Step 3 – Assemble the trunk

Place one of the oasis balls into the flower pot and push the 3 sticks into the oasis so that it is firmly in place but not pushed all the way through to the other side of the oasis.  This creates the base and trunk of your arrangement.

Step 4 – Cut your greenery

Work with small sprigs of greenery at a time, two or 3 leaves on a stem.  Cut away any stray stems that look unsightly


Step 5 – Arrange your base greenery

Push the sprigs of greenery into the base oasis until you can no longer see the oasis.


Step 6 – Select your flowers

We decided to go for two colours within our arrangements, but you can use more colours or just one colour in yours, it is entirely up to you.  


Step 7 – Secure the top oasis

Carry your arrangement back over to the sink and whilst holding the trunk of the arrangement push the second oasis ball onto the top of the sticks.  Don’t worry about the water coming out of the oasis, this is normal – just make sure you have a towel to hand! 


Step 8 – Add the flowers

Now you can start adding the flowers to the ball.  You don’t need a huge stem on the flowers, about an inch (2.5cm) will do.  The aim is for the top to be spherical, so depending on how round your oasis is, you might have to push some flowers in more than others.


Step 9 – Keep adding

Keep adding flowers and greenery until you can no longer see the oasis ball beneath.  Don’t forget the underneath of the top ball, it is a good idea to stand back and look at your arrangement from all angles to make sure you don’t have any bald spots.


Step 10 – Stand back and admire!

And there you have it, a beautiful flower arrangement that costs under a tenner to produce, now all you have to do is decide who to give it to.


Until next time…

Amanda x